Additional ResourcesSafety Box Ceiling Fan Installation Manual |
|
Here is the Detailed Instruction Manual for Ceiling Fan Safety Brace Spanner Box [PDF]
|
More about Installing and Wiring a Ceiling Fan
Learn more about Wiring a Ceiling Fan |


 |

|
||||||||||
 |
 |
 |
 |
 |
|||||||
 |
|||||||||||

|
Summary:
How to Install a Ceiling Fan Box and the Support with Photos: The example shows the flat ceiling fan box, a spanner bracket box the box marker for drilling the hole for the ceiling fan box, installing the wire and attic wiring, wiring to the ceiling fan box, measure for the ceiling fan box support, installing the ceiling fan support brace, the electrical wiring to the ceiling fan box, and installing the brace for the box for the ceiling fan.
© By: Dave Rongey |
How to Install a Ceiling Fan Electric Box and Cross Support
Make sure to spread out a drop cloth to keep the floor and furniture protected from sheet rock dust and insulation that could fall and make a mess.
This installation provided great attic access to allow me to install a wooden block for necessary support. This saved the cost of a spanner bracket, and since I needed to bring Type NM Cable to the location anyway, it just made sense to select this approach.
As you can see I came prepared with a spanner box just in case. This Heavy-Duty Metal Pancake Box is designed for the weight of a ceiling fan. The 4 inch hole saw provides a perfect sized hole. After marking my location, the hole was cut and I was ready for installing the block of wood.
Attic Access Allows Installing a Ceiling Fan Box and Cross SupportSee a ceiling fan wiring and installation in home wiring complete with pictures to help you get it right. This installation of a ceiling fan shows how a 2 X 4 wood block was installed to provide the necessary support for a 4 Inch approved ceiling fan box. |
|
 |
 |
Ceiling Fan Installing Box This is a hole saw that is the same diameter as the metal ceiling fan box which fits in my cordless drill. |
Flat Ceiling Fan Wire Box This is the approved ceiling fan box that will be installed. This special box comes with an insulated bushing and special screws used to mount the ceiling fan assembly to the box. |
 |
 |
Ceiling Fan Spanner Wire Box Bracket This is another type of approved box which may be used for ceiling fans as well. This assembly has spanner brackets that may be adjusted of the ceiling joists. This kit is great to use when the attic space is not accessible or when there is a second floor above. |
Ceiling Fan Box Marker The homeowner used blue tape to mark where the ceiling fan should be located. I used my awl to make the initial pilot hole for my hole saw. |
 |
 |
Drilling Hole for the Ceiling Fan Box The hole is drilled carefully while supporting the drill motor to avoid binding between the hole saw and the sheet rock. |
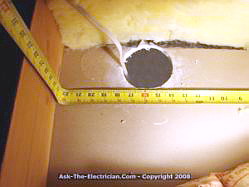
The Drilled Hole for the Ceiling Fan Box A nice clean hole is made which reveals the attic insulation which is between the ceiling joists. |
Safety measures must always be taken to get the job done without problems. Take a good light source, wear a dust mask and safety goggles. Plan your work when the attic will be the coolest. Stay on the wooden trusses and ceiling joists and do not put your weight on the sheet rock ceiling below the insulation. Use a tote tray or parts caddy or tote tray to keep your materials together along with your tools. Its very easy to loose things in the insulation. Take your time and be very careful. Being in good physical shape is a must. If you don't feel comfortable about proceeding with your project, consult a reliable helper or hire a professional to do the job. |
|
 |
 |
Installing the Wire to the Ceiling Fan Box The cable was installed from the existing wall switch and brought to the ceiling fan box location. |
Attic Electrical Wiring for the Ceiling Fan A view from inside the attic reveals good working space for installing the required cross support or block of wood. |
 |
 |
Wiring to the Ceiling Fan Box The opening in the ceiling is revealed and we see no further obstructions. |
Measure for the Ceiling Fan Box Support A measurement is made between the two ceiling joists so I can cut the cross support piece block of wood. |
 |
 |
Install Attic Electrical Wiring for the Ceiling Fan The cable leading back to the switch was stapled to the truss for protection. |
Installing the Ceiling Fan Electrical Box and Support Brace The cross support is fit snugly into place and ready to be fastened into position. |
 |
 |
Electrical Wiring to the Ceiling Fan Box Insulation is moved out of the way to allow me to secure the cross support between the ceiling joists. |
Installing the Screws into the Support Brace for the Ceiling Fan Using my battery operated drill motor, I drove in 3 Inch screws to secure the block. |
Additional ResourcesSafety Box Ceiling Fan Installation Manual |
|
Here is the Detailed Instruction Manual for Ceiling Fan Safety Brace Spanner Box [PDF]
|
More about Installing and Wiring a Ceiling Fan
Learn more about Wiring a Ceiling Fan |
|
Wiring Ceiling FansElectrical Project Skill Level:Beginner to Intermediate. Electrical Tools Required: Basic Electricians Pouch Hand Tools, a non-aluminum ladder and Voltage Tester. Estimated Time: Depends on personal level experience, ability to work with tools and access to the ceiling fan. Electrical Safety: Identify the ceiling fan circuit, turn it OFF and Tag it with a Note before working with the wiring. Electrical Wiring Parts and Materials: Electrical parts and materials for ceiling fan wiring projects should be approved for the specific project and compliant with local and national electrical codes. Electrical Codes and Inspections: Installing additional home electrical wiring should be done according to local and national electrical codes with a permit and be inspected. |
|
Learn Electrical Wiring Instructional Electrical Wiring Videos 
|
|
|
|
» Wire It RIGHT!« Wire it with Confidence! Fully Illustrated Instant Download 
Now You Can Wire it like a Pro! |
| Search Electrical Wiring Topics |
|
|


